- Home
- Edit Naturally
How to Edit a Wildlife Photo Without Losing Its Natural Feel
My first SLR was a Zenit, back in the "olden days" when film was the only option.
I’d drop the roll at the chemist and spend the next hour staring at my watch. I counted down every second until I could push back through the door, setting the overhead bell jangling.
Was I in for more blurry animals and another 'photo too dark to print' label?
More often than not, the answer was yes. The envelope revealed only slightly lighter shadows in a black rectangle. There was no way to salvage a bad shot. It was down to me, and guesswork, to get the settings right in the moment.
Digital photography changed everything. It gave me a second chance.
Now, those failures are my greatest teachers, and I want them to be yours, too. A technically imperfect photo isn't a dead end; think of it like a lump of clay that you can shape into something beautiful.
Even today, it's rare to get a perfect shot straight out of the camera. Most images need that shaping, moulding the light and shadow until the real story emerges.
Let me show you how I approach that process.
Crop Your Photo to a Specific Size
Nature is wild, it doesn’t always co-operate and position itself just where I want it in the frame.
So my first step is to sit back and look at the composition. Is there enough room in front of the bird? Would cropping the unwanted areas tell the story better?
Or is there something in the background that I didn’t see when pressing the shutter? Something distracting?
 European Robin before cropping the photo.
The light coloured bark on the left distracts, as do the blurred branches in the background. Scroll down to see the cropped version.
European Robin before cropping the photo.
The light coloured bark on the left distracts, as do the blurred branches in the background. Scroll down to see the cropped version.In the case of this robin photo I felt that lighter patch of bark behind the robin kept pulling my eye while my brain was saying “look at the robin, Carol!”
Rather than jumping straight in and cutting off that section I study the picture further.
The background is out of focus, but those intrusive light branches, spoil the photo for me. What is the simplest way to deal with them?
The photo was taken on a camera with a high enough megapixel count to allow me to do a pretty drastic crop.
If I remove the elements I am unhappy with will I be left with a “better” photo? One that pleases me more? Yes, that works!
 Removing the distractions when cropping draws attention to the bird.
Good job that bark wasn’t just in front of the robin. With the other distractions the image would not have been worth editing. This one won’t win any awards, but I like it now, and that is what matters to me.
That square crop is a bit different but I don’t tend to play by the rules.
Getting the Light Just Right
Even when I go out with a plan, sometimes the unexpected happens and I try a grab shot.
In this next instance I was photographing bees when a buzzard flew over. In my haste I forgot to change the camera settings resulting in a bird that is much too dark. Can it be rescued?

Probably not, but let’s find out why together.
When I bring it up on the screen I immediately spot my mistake. The shutter speed had been set high to freeze the motion of the bees, but leaving it at 1/8000th of a second was overkill for a soaring buzzard.
If you're still getting comfortable with manual settings, my guide to camera settings walks through exactly how I approach ISO, shutter speed, and aperture decisions.
The bird was also too high, leaving lots of boring blue sky around it, leaving the image crying out for a drastic crop. But in this case doing so might introduce new problems.
But first let’s tackle the underexposure.
I use Lightroom, and like most photo editing programs it has an Auto button. Will this magically solve the issues in this picture?

Eeeek! Definitely NOT! It looks like a monochrome bird in an almost white sky. Quick press the undo button, Carol!
I need to tackle this slowly and manually. First I increase the exposure slider by half a stop. The sky turns pale blue, but there is little difference to the buzzard.
Let me try raising the shadows to +20 and the blacks by +10 to see if that affects the bird while leaving the sky as is.
Hmm that's an improvement but its still too dark. I also begin to see a white “halo” around the feathers which feels unnatural.
I try dropping the contrast by -30, which helps with that ugly halo.

By this point I am fed up with squinting to see the details so decide to crop the image. It worked for the robin, after all.
But cropping so drastically begins to highlight another issue. Noise! This becomes even more apparent when I adjust the highlights (+20) and white (+20) sliders.
Noise!
The picture is taking on an unpleasant graininess that reminds me of static on an old TV set.

At this point I decide to abandon all hopes of “fixing” this photograph. Editing is not a magic bullet that can bring a bad photo back to life.
I could have saved myself a lot of time by looking at the histogram before starting. The histogram has become such an essential part of my workflow that I wrote an entire guide about using histograms to help other photographers avoid my mistakes. You might find it helpful.
Working with Colour
My starting point for colour is always a RAW file because it gives me the most flexibility when editing a photo.
But that flexibility can also be a trap, making it all too easy to push the colours too far, which I learned the hard way...
My usual method of checking the white balance involves the eyedropper tool. Clicking on a spot in the image that I feel ought to be a neutral colour will adjust all the other colours instantly.
But… and there’s always a but… what if "correcting" the colour actually erases the real colour of the moment?
For example, that moment when I drew back the curtains to gasp at the beautiful sunrise exploding outside the window.
The dark greens of the hedge were glowing in the golden light and perched on top was a Dunnock, its usual greyish tones transformed into golden browns.
My camera was nearby so I opened the aperture right up to get that lovely bokeh effect, where highlights form soft circles of light and took a photo.
What a great start to the day.
 Dunnock photo captured at sunrise (unedited)
I believe we’ve all experienced that feeling when a photo on the computer doesn’t quite seem to match up to our memory of what we saw in real life.
When I brought the Dunnock into Pixelmator Pro I was at first a little underwhelmed. What had happened to the magic of that moment?
The colours didn’t seem to be as glowing or golden as I remembered them. How can I edit this photo to enhance reality?
“Saturation! That’s what it needs." was my first thought. On this occassion I didn’t want to neutralize the colours, but intensify them.
So I dragged both the saturation and vibrance sliders to the right. However instead of improving the photo I could see that my heavy handedness almost destroyed it! “Yikes! No, no, no!”
 Overly saturated version - an example of excessive editing (created in Pixelmator Pro for Mac)
Dragging the sliders back restored the image and I realised that the original starting point was actually perfect.
It took seeing the “overcooked” version to make me accept what the camera had captured.
Sharpening the Details
Sometimes a photo is technically in focus, but it just lacks... life.
The details feel a little soft, the magic isn't quite there. I had this exact feeling with a photo of a mandarin duck.
The colours were vibrant, but I knew the intricate patterns on its feathers could really 'pop' with a bit of careful sharpening.

My first port of call is usually the 'Amount' slider under the Details section in the Lightroom Develop module.
I pushed it up gently, watching those fine feathers on its head become more defined.
Then I played with the 'Detail' slider.
My trick here is to push it all the way to the right to see the extreme effect, and then slowly dial it back. It’s a negotiation with the image, finding that sweet spot where the detail emerges without looking artificial.
But I noticed a problem.
While the duck was getting sharper, the smooth water around it was starting to look gritty. It ruined the peaceful feel of the water.
I thought, 'If only I could sharpen the duck and leave the water alone.'
This is exactly what the 'Masking' slider is for...
At some point in the past a friend introduced me to holding down the Alt or Option key while dragging the masking slider.
As I drag the slider to the right the image first goes pure white and then gradually the sharpest areas turn from white to grey to black.
The black areas will not receive any sharpening so I keep going until the background is solid black then pull it back slightly until just the tiniest hint of texture remains. I dialed it up to 72 for this image.
At this point, a little voice in my head started chanting 'sharpen the details, but don't overdo it.' It's such a delicate balance that I created a detailed sharpening guide covering all the techniques I wish I'd known when I started.

A Battle with the Grain: The Story of the Owl
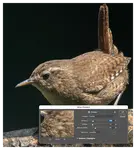
When I saw the long-eared owl shown below, it was shaded by the foliage. To get the shot, I had to push my camera’s ISO high, and I knew what that meant: digital noise. Again!
The challenge was to clean it up in post processing (the technical term photographers use for editing) while keeping the textures of the feathers.
 Seen at normal viewing distance this photo of a long-eared owl looks fine. But...
 Zoom in closer, and you'll notice graininess in both the background and softer areas.
I discovered there are two types of noise.
First the easy win. Those distracting little coloured specks are known as colour noise and they are the first to go in my process. A gentle nudge of the colour noise slider in Lightroom usually handles them without fuss.
The real balancing act is with the luminance noise—the grainy texture itself.
Pushing the slider too far turns the photo into a waxy, unnatural mess. My goal is to find the sweet spot where the grain softens but the owl’s feathers stay sharp and detailed.
Sometimes, I even leave a little grain in; it's the texture of twilight, and it can add to the mood.
Finding Your Own Story
When I think back to waiting for that envelope of photos to come back from the chemist, I remember the feeling of helplessness when my pictures were blurry or badly exposed.
Digital editing has changed everything. It is not a magic bullet - as my story of the buzzard shows - but it does give us a second chance.
Through this guide I have walked through my editing process, but the real lesson isn’t about sliders and settings. It’s about learning to see and evaluate.
Do I need to crop this image? Is it worth spending time on or is it destined for the bin anyway?
How far should I go? Will taking it further spoil the moment I captured? Do I like the effect I created or does it look artificial?
The most important tool is always my own memory of the moment. I have learned to trust it. If an edit doesn’t feel right, it probably isn’t. My goal is to create a photo that makes me say..
“Yes, that’s how it felt to be there!”
So take my ideas, play with them, and find your own stories in your images.

I've spent over 30 years walking and photographing UK wildlife, with work featured in Canon EOS Magazine and a Wildlife Trusts calendar. I still learn something new on most outings.
This site is my field notebook full of photo tips, help on identifying what you see, and how to decide where to walk.
Step Behind the Wild Lens
Seasonal field notes from my wildlife walks: recent encounters, the story behind favourite photos, and simple, practical tips you can use on your next outing.
Explore More Nature Walks, Wildlife and Photo Tips
A Histogram in Photography - How to Read and Interpret It
Learn the vital role of a histogram in photography to achieve correct exposure, so you can adjust for underexposed or overexposed shots with confidence
How To Sharpen Wildlife Photos: (Photoshop, Lightroom, Topaz)
Make wildlife photos crisp. Learn how to sharpen wildlife images in Photoshop, Lightroom, and Topaz Sharpen AI, fix motion blur, and avoid halos.

Copyright © 2018- naturewalkswithcarol.com All rights reserved
Home. | About Me | Contact Me | Blog | Privacy Policy