- Home
- Photo Basics
- Camera Settings
What Do Aperture, Shutter Speed and ISO Actually Do?
My first-ever attempt with a "proper" camera was a shot of a drake Mallard, his head a jewel of iridescent green in the morning sun.
In my mind, it was a masterpiece. The print told a different story.
The green jewel was gone, replaced by a muddy, dark shadow.
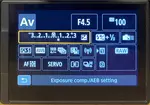
I studied the buttons and dials, all fractions and decimals and letters that meant nothing to me, before turning to my Oracle, Grandad Bill.
I don't remember his exact words, but they were something along the lines of "try one thing at a time. See what effect it has and whether you like it."
So I grabbed pencil and paper and noted down what I had picked for each shot. Recording my own EXIF data before I even knew what that was.
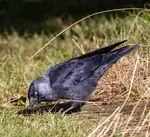
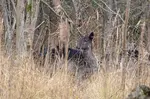
 To keep this friendly robin crisp against the messy field background I chose an aperture of f7.1
Why doesn't my photo look like what I saw?
Your eyes and brain do things automatically that a camera simply can't.
Your eyes handle bright and dark at the same time. You can see detail in the shadows and the sky in a single glance. Your camera has to choose one or the other. That's where exposure and ISO come in.
Your brain filters out clutter. When you watched that butterfly, you didn't notice the bin behind it. Your camera recorded everything equally. That's where aperture helps.
Two eyes give you depth. A lens gives you flat. That sense of the butterfly floating in front of the hedgerow? Your camera needs help recreating it. Aperture and your position do that job together.
Your brain stabilises movement. You saw the robin pause mid-splash, crystal clear. Your camera either froze it or blurred it, depending on shutter speed. Nothing in between.
Your eyes adapt to the light's colour. That warm golden glow felt magical. Your camera may have neutralised it into something flat. White balance and the time of day you shoot affect this.
Each of the three settings below fixes one or more of these gaps. Once you see which gap your photo fell into, you'll know exactly which dial to reach for.
"How Do I Make the Background Just... Melt Away?"
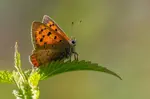
Years later, a peacock butterfly, wings closed, perched on a thistle. At last it had settled, giving me an opportunity.
Then a sudden flash of fiery orange and four mesmerizing violet eyespots as it spread those wings. In the moment I didn't see the chaos.
The messy tangle of grass, dead weeds and intruding fence post.
The camera did. "How can I tell the camera that the butterfly is the star of the show, Grandad?"
He started spouting words I didn't understand. I looked back at my sitter, squinting and seeing the tiny detail of its tongue curling up. Everything else disappeared.
Something in my brain clicked. That is how I wanted my photo to turn out!
I turned back to see my grandad's toothy smile and crinkly eyes. He nodded.
"See this 16 on the dial here? Try turning it down to 4. Now try again."
As I glanced at the screen I gasped. There was a crisp, detailed insect against what looked like a soft, blurry watercolour painting.
"Why did changing that number make such a difference?"
This time I listened as he explained aperture and depth of field.
How f16 was like our eyes taking in a whole scene at once, and f4 allowed us to concentrate on one small part of it.
Now every time I change the aperture I picture myself squinting.
That butterfly moment hooked me. If you want to try it yourself, here's my full guide to butterfly photography.
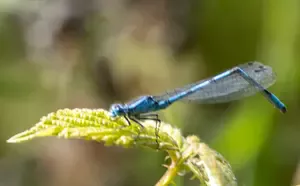
 This peacock butterfly seems to know it’s the star of the photo. The soft background indicates the crop field without emphasising it
"How Can I Freeze a Single Moment in Time?"
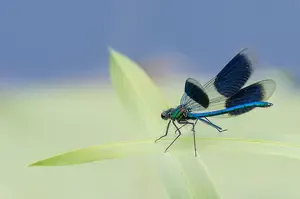
I looked up from my work as I spotted movement out of the corner of my eye. A robin was bathing in the birdbath outside the window, sending a chaotic spray of water everywhere.
Grabbing my camera off the table I focused in on the action. Then paused. How was I going to catch those water drops in mid air? Think, Carol, quickly!
I still wanted an out of focus background, with the robin and water sharp against it.
A wide aperture would help but it couldn't do the job alone. I wanted to catch a split second so it was time for shutter speed to enter the picture.
Time to experiment. How fast did the shutter speed need to be in this situation? I made an educated guess and set 1/1600th of a second. I fired off a burst of shots hoping at least one would capture the perfect moment.
Moments later the robin finished his ablutions and flew off, leaving me to discover if I had achieved my goal. Even on the back of the camera I could see the individual droplets, like tiny pearls surrounding the bird.
One shot had caught the beak open, and I smiled. Impatient to see it larger, I slipped the SD card into my Mac.
Oh no! The bird's wing had not been quite frozen. But I realised this actually worked in my favour, I could see the speed at which the robin had been fluttering them.
I debated internally. Would 1/2000 have worked better? It may have frozen everything, but did I actually want that? Or I could have gone in the other direction, 1/1000 might have allowed more blur. But would that have been too much, too abstract?
For this particular situation I was happy that my intuition had paid off.
Not sure what birds visit your garden? You might be surprised.
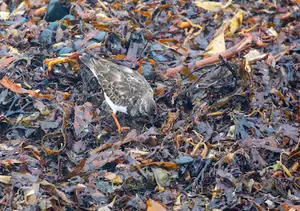
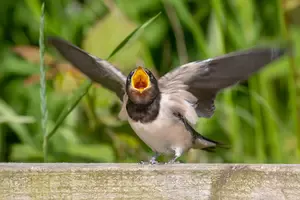
 Crisp feathers, a glint in the eye, the robin was too occupied with his bath to worry about the decisions I was making about shutter speed
"Do I Have the Courage to Shoot in the Dark?"
Every visit to Paxton Pits offers the possibility to see and maybe photograph a kingfisher. But I can count the number of times it has happened on one hand.
A murky winter's morning didn't instill much hope in me but I felt the outdoors calling me.
As I turned for home, a streak of turquoise flashed across the water and landed on a branch in front of me. I started to raise the camera, then considered the light.
Or should I say, lack of it. But the bird was still, staring down into the water for a fish. Worth a try? Always!
A split decision was called for. Did I want a soft background but risk a blur as the bird dived? Or a grainy shot that stopped the action? Neither was ideal.
Could ISO help me out here?
Back when Grandad accompanied me on my walks he would have said "keep it below ISO 400". But cameras have moved on since then. I had pushed it to 1600 before, could I go further?
The kingfisher bobbed its head prompting me to a decision. I flicked it up to 2000 and aimed. I grabbed two photos before it took off up the lake.
Not expecting much, I took a look at the back of the camera. Instead of the grainy pictures I expected, they were half reasonable.
The bird was sharp (enough), the background blurred if a bit grey, and some noise removal when editing should fix the grain.
If I had stuck to a "safe" ISO I wouldn't have a record of the encounter, I now knew that 2000 was usable. I wondered how much further I could push it. Maybe low light is where the real magic happens.
I continued my way to the car, satisfied that trying without expectation could sometimes pay off.
 It might be grainy but if I hadn't taken a chance I would have gone home without this kingfisher photo
Thank you Grandad for your wise words to an eager younger me. I wish you were still here to see me now, kingfishers on the camera card, a willingness to go that one step further, always concentrating on "just one thing" while keeping the other camera settings in mind.
Now you know what each setting does on its own, the real question is: which one do you reach for first?
- How to Choose the Right Camera Settings in the Field walks you through a simple 3-step workflow for real situations, from birds in flight to fading light at dusk.
- Metering for Wildlife Photography explains how your camera reads light, why it sometimes gets it wrong, and how to nudge it back on track.
- Shutter Priority Mode gives you control over motion so you can freeze a bird mid-flight or blur a stream to silk.
Ready to head out?
You might want to check my nature walk checklist first.
If you're just getting started, here's my guide to getting into wildlife photography.

I've spent over 30 years walking and photographing UK wildlife, with work featured in Canon EOS Magazine and a Wildlife Trusts calendar. I still learn something new on most outings.
This site is my field notebook full of photo tips, help on identifying what you see, and how to decide where to walk. About Me.
Step Behind the Wild Lens
Seasonal field notes from my wildlife walks: recent encounters, the story behind favourite photos, and simple, practical tips you can use on your next outing.
Explore More Nature Walks, Wildlife and Photo Tips
Woodland Photography Tips for Beginners: A UK Autumn Walk
Simple woodland photography tips for beginners — camera settings, composition and phone-friendly ideas from a real autumn walk in the UK.
Camera Settings for Wildlife Photography: What to Set and When
Stop guessing your camera settings. A simple 3-step workflow helps you choose the right settings for any wildlife situation, from birds in flight to dusk.
A Histogram in Photography - How to Read and Interpret It
Learn the vital role of a histogram in photography to achieve correct exposure, so you can adjust for underexposed or overexposed shots with confidence


Copyright © 2018- naturewalkswithcarol.com All rights reserved
Home. | About Me | Contact Me | Blog | Privacy Policy