- Home
- Photo Basics
- Accessories
- Wildlife Photography in the Rain
Wildlife Photography in the Rain: Settings, Safety, and Shots Worth Getting Soaked For
The rain in Northumberland that day wasn't gentle. It was a cold, relentless October soaking that found every gap in my so-called waterproof gear. I was six miles into a hike, halfway to nowhere, drenched to the bone, my camera tucked under my jacket like contraband.
Most photographers would have stayed in the car. That is exactly why you should go out.
Rain hands you three advantages the dry days don't: soft, even light, empty paths, and wildlife that behaves more naturally. This guide covers how to stay safe and keep working, what camera settings make rain look like rain, and how to keep your lens clear through a downpour. There is a field checklist at the end you can copy.
Rain Photography Quick Wins
A 60-second setup, built for rain and cold.
- Protect your body first. Cold hands end a shoot faster than a wet camera.
- Microfibre cloth, sealed and within reach. Drops on the lens ruin more keepers than a high ISO ever will.
- Start simple: f/4 to f/5.6 and ISO 800 to 3200, then set your shutter speed for the story.
- Choose the rain look: freeze it at 1/500 to 1/1000s, or streak it at 1/30 to 1/60s.
- If autofocus hunts, switch to manual. Take control when the camera can't see through the rain.
Field order: stay functional, keep shooting, come home safe.
Why Light Rain Is a Gift for Wildlife Photography
We are taught to wait for the golden hour. Rain clouds are their own kind of gift: a giant softbox that evens out the light, deepens colour, and kills harsh shadows.
Out there, shivering, I watched a fox move through the drenched grass. The greens and browns weren't washed out. They were deeper and richer than I usually see them.
That is the first advantage of working in the rain: the light is already doing you a favour.
Woodland is where wet-weather skills really pay off. The canopy gives you some cover and the light is softer, and Fermyn Woods is a good one to try.
Stay Functional: What to Wear for Wildlife Photography in the Rain
Your first job in the rain is to protect yourself, not the camera.
Before that hike I had worried for days about my gear. Was it weather-sealed? What if water got in? Then, as the rain seeped through my jacket, the real lesson arrived. The piece of kit that matters most is you. When your hands stop working, the shoot is over, even if the camera is fine. I was so cold I could barely feel the shutter button.
No photo is worth your wellbeing. Before you think about camera covers, get the gear that keeps you safe and thinking clearly:
- A genuinely waterproof shell jacket and trousers, not "showerproof"
- Waterproof boots with good grip on wet ground
- Warm, non-cotton layers like merino wool that insulate even when damp
- A warm hat and waterproof gloves to keep your fingers working
Your ability to think and function is what gets the shot. Comfort counts too: a wet strap turns into a chafing rope within the hour, so pack a spare strap or a simple neck buff. Small annoyances end shoots early, and a buff can buy you another hour outside.
Camera Settings for Rain: Aperture, ISO and Shutter Speed
As the light drops, stop thinking in "nice photos" and start thinking in trade-offs. In the rain you are balancing three dials: aperture for light, ISO for a workable shutter speed, and shutter speed for the look of the rain itself.
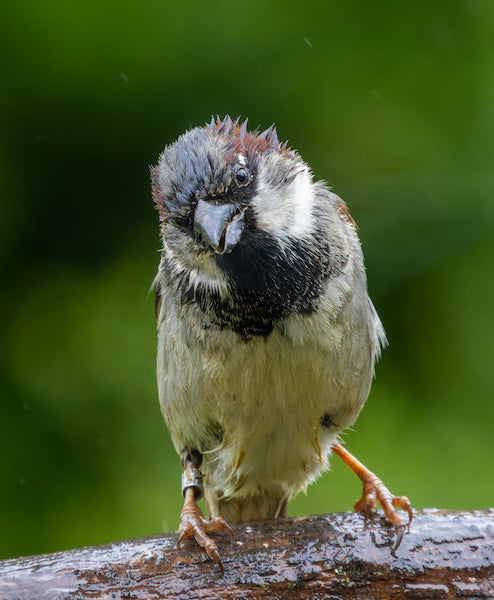
A bedraggled sparrow, sitting out the downpour.
Aperture: letting the light in
Open up. Set the camera to Aperture Priority (Av on Canon, A on most others) and turn the dial wide, to f/4. A wide aperture lets in the most light and keeps your shutter speed usable as the day darkens.
ISO: making the sensor more sensitive
When the gloom is winning, raise the ISO. I pushed mine to 1600. Purists worry about grain, but a slightly grainy photo of a real moment beats a clean photo of nothing, every time. The same thinking carries straight over to shooting wildlife in low light.
Shutter speed: deciding how the rain looks
This is the creative choice. Freeze the raindrops in mid-air at 1/500s, or let them streak into silver ribbons at 1/30s. For wildlife I rarely drop below 1/250s unless the animal is sitting still. Rain streaks look wonderful, but motion blur on the subject kills your keeper rate.
Keeping Your Lens Clear in the Rain
The fastest way to ruin a rainy shoot is a wet lens. I learned this the hard way. I was tracking a bird when a gust blew a sheet of rain sideways into my lens hood, and it flooded in seconds. I carried on, oblivious. When I finally checked the screen, every frame was a smeared, ghostly haze. The hood I thought was protecting the lens had turned into a tiny bucket.
I wiped the glass with my wet sleeve and made it worse. Keep a microfibre cloth in a sealed bag where you can reach it, and wipe the front element before every important moment, not after.
Then the autofocus started hunting through the haze. I stopped bargaining with it and switched to manual focus. It felt slower at first, but it was the only way to hold a clean eye through the rain.
Why Wildlife Behaves Differently in the Rain
The best part of that whole soaking? The quiet. There was no one else for miles. The hides were empty, and the usual chatter of other photographers was gone, replaced by wind and rain.
When the footpaths empty, animals settle. You will often see longer feeding, less alarm-calling, and fewer freeze-and-stare moments. That is the real reward for going out in weather that keeps everyone else indoors: you get the wild to yourself.
Photographing Puddles and Reflections After the Rain
When the rain eases, a new set of pictures appears. Every puddle becomes a temporary mirror, holding the clearing sky.
I watched a blackbird bathing in one. I got down low, almost flat on the wet ground, to photograph the action from its level. Shoot low, expose for the bright highlights in the sky reflection, and let the bird sit a little darker for drama.
The light after a storm is often the best of the whole day. Look for these reflections. They turn an ordinary scene into something worth printing.
Your Turn
So the next time the clouds gather and the forecast looks grim, I hope you don't see a cancelled day. I hope you see an invitation.
Zip up your jacket, protect yourself first and your gear second, and step out the door. Go and find a story only the rain can tell, and come back with frames the fair-weather crowd never saw.

Rain Photography Field Checklist
Copy this before a wet-weather shoot. Priorities first: stay functional.
Must have — you first (stay functional)
- Waterproof shell jacket and trousers (not "showerproof")
- Waterproof boots with good grip
- Warm non-cotton layers (merino or synthetic)
- Warm hat and waterproof gloves (keep fingers working)
Must have — camera basics
- Microfibre cloth in a sealed bag (fast access)
- Lens hood and lens cap (wipe often)
- Spare batteries in an inside pocket (cold drains them fast)
Must have — settings (quick reference)
- Aperture wide (f/4 to f/5.6) to let light in
- ISO ready to push (800 to 3200 or higher as needed)
- Shutter choice: freeze (1/500 to 1/1000s) or streak (1/30 to 1/60s)
- If autofocus hunts, switch to manual focus
Nice to have
Protection and comfort
- Waterproof camera cover or dry bag
- Spare dry strap (comfort means longer in the field)
- Small towel or chamois (better than a sleeve)
- Silica gel packs for the bag (drying out after the shoot)
Stability and technique
- Steady handheld technique, or a monopod if needed
- Keep the cloth accessible and wipe before the important moments
Creative, after the rain
- Hunt for puddles and low-angle reflections
- Look for backlight on raindrops and silhouettes
- Watch behaviour: wildlife is often calmer once everyone else leaves
- Dry and ventilate your gear properly afterwards
Tip: keep this checklist near the top of your bag. It saves you from the "I forgot my gloves" outings.


Step Behind the Wild Lens
Seasonal field notes from my wildlife walks: recent encounters, the story behind favourite photos, and simple, practical tips you can use on your next outing.
Copyright © 2018- naturewalkswithcarol.com All rights reserved
Home. | About Me | Contact Me | Blog | Privacy Policy