- Home
- Photo Basics
- Shutter Priority Mode
Take Control of Shutter Priority Mode
Tired of blurry bird photos when you know the moment was perfect? Frustrated that your camera can't seem to freeze that split-second of wildlife action you witnessed with your own eyes?
If you're ready to move beyond Auto mode and take creative control over how motion is portrayed in your nature photography, it's time to meet Shutter Priority mode (often marked S or Tv on your camera dial).
This powerful semi-automatic setting lets you dictate the crucial element – the shutter speed – while your camera intelligently assists with the other exposure settings (aperture and ISO).
Want tack-sharp, frozen action? You choose a fast speed.
Prefer an artistic sense of motion? Select a slower one, like in the swallow photo below, where a carefully chosen speed captured the frantic blur of its wings demanding food.

Understanding Shutter Priority Mode
Shutter Priority mode, marked 'S' or 'Tv' on most camera dials, puts you firmly in control of one of photography's most powerful creative tools: shutter speed.
This setting dictates exactly how long your camera's sensor gathers light for a single shot.
The magic of controlling shutter speed lies in its direct impact on capturing motion.
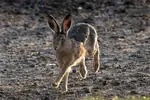
Want to freeze the frantic beat of a bird's wings or capture the crisp splash of water from a bathing robin? Select a fast shutter speed (like 1/1000s or quicker).
Want to convey the smooth flow of a stream or the energetic blur of an animal running past? Choose a slower shutter speed (perhaps 1/30s or longer, usually requiring a tripod for stability).
While you make the key decision about motion, Shutter Priority acts as a helpful assistant for exposure.
Based on the shutter speed you've set and the available light, your camera automatically selects the aperture (lens opening) it thinks is needed for a balanced picture.
If you're using Auto ISO, the camera might adjust the ISO sensitivity too, giving it more flexibility to achieve that exposure.
This automation lets you focus on capturing the right moment of action without juggling all three settings simultaneously.
Step-by-Step Guide: Your First Shutter Priority Shot
Let's get you started with a simple, practical approach:
Step 1: Set Your Camera
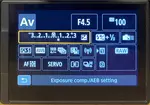
Turn your camera dial to "S" (Nikon/Sony) or "Tv" (Canon). You should see "S" or "Tv" displayed on your camera's screen or viewfinder.
Step 2: Choose Your Shutter Speed
Here's a simple starting point cheat sheet:
- Stationary Animals (perched bird): 1/250s
- Walking Animals (deer, fox): 1/500s
- Birds in Flight: 1/2000s or faster
- Creative Motion Blur: 1/30s to 1/125s (requires tripod)
Step 3: Set Your ISO
For beginners, I recommend starting with Auto ISO. This gives your camera flexibility to adjust sensitivity based on available light while you focus on mastering shutter speed control.
Step 4: Take the Shot and Review
Look for a sharp subject and correct exposure. If your photos are too dark, the camera has hit the limit of your lens's aperture, you may need to increase ISO or use a faster lens.
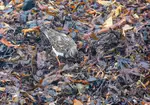
 No time to fiddle with exposure as the Jackdaw flew over my head! Shutter priority and 1/2000th second captured the action and the camera took care of the exposure.
Exposure Triangle Components
To truly master Shutter Priority Mode, you'll need to understand the Exposure Triangle.
This concept describes how three key settings (your chosen shutter speed, the camera-selected aperture, and the resulting ISO) work together to determine the overall brightness, or exposure, of your final photo.

In Shutter Priority (S/Tv), you control one crucial point of this triangle.
Shutter Speed: As we've focused on, this is the duration the shutter is open (e.g., 1/1000s, 1/30s). You set this primarily to control how motion is captured (freeze or blur).
Aperture: This is the size of the opening inside your lens, measured in f-stops (like f/2.8, f/8, f/16). A wider opening (lower f-number like f/2.8) lets in more light and creates a shallower depth of field. In S/Tv mode, the camera automatically chooses the aperture based on the shutter speed and available light.
ISO: This adjusts your camera sensor's sensitivity to light. Low ISO values (100, 200) are best for bright light and clean images. High ISO values (1600, 3200+) are essential for low-light situations or very fast shutter speeds, though they can introduce digital noise.
Practical Applications: Controlling Motion with Shutter Priority
Using Faster Shutter Speeds (Freezing Action)
One of the most powerful uses of Shutter Priority in wildlife photography is to freeze motion, capturing incredibly sharp, detailed images even when your subject is moving quickly.
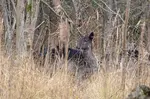
Be Ready for the Unexpected: Nature rarely performs on cue! By pre-setting a reasonably fast shutter speed in S/Tv mode (say 1/1000s or 1/1600s) you're prepared to capture those fleeting moments when you round a corner and surprise a deer or spot a bird of prey soaring overhead.
 A dose of luck, backed by preparation! Having Shutter Priority mode set to 1/1600s 'just in case' allowed me to sharply freeze this sudden aerial interaction between Common Terns.
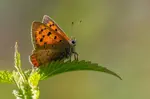
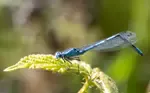
Capture Sharp Detail in Fast Movers: For subjects renowned for their speed – think birds taking flight, diving kingfishers, leaping dolphins, or flying insects – a fast shutter speed is absolutely essential to avoid motion blur and render sharp details.
 Pushing speeds to the limit! To freeze the incredibly fast wingbeats of this hoverfly required an extremely fast shutter speed of 1/6400s, dialed in using Shutter Priority mode.
Creating Motion Effects with Slower Shutter Speeds
Deliberately choosing slower shutter speeds unlocks creative ways to portray movement, adding energy or tranquility to your shots. However, a sturdy tripod is usually crucial for these techniques.
- Silky Water Effects: Transform waterfalls, rivers, or coastal waves into smooth, ethereal patterns using speeds from 1/15s down to 1 second or longer.
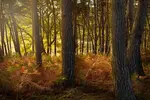
 Capturing the flow: Shutter Priority set to 1/15th of a second allows the movement of the River Dart to blur beautifully over the rocks, while keeping stationary elements like the ferns and banks sharp. A tripod was essential here!
- Wind-Blown Foliage: Capture the feeling of a breezy day by letting leaves or grasses blur gently while keeping static elements sharp. Try speeds around 1/15s to 1/2s.
- Panning for Dynamic Blur: Create a sense of speed by tracking a moving subject smoothly while using a moderately slow shutter speed (1/30s to 1/125s). This advanced technique takes practice!
Essential Gear That Makes Shutter Priority Easier
A Sturdy Monopod
When using slower shutter speeds for creative blur effects, a monopod is essential for stability. It's also helpful for supporting longer telephoto lenses during wildlife photography sessions.
Fast Memory Cards
Shooting fast-moving animals often means using burst mode. A slow memory card can't keep up with continuous shooting, potentially causing you to miss the perfect moment.
Common Mistakes & How to Fix Them
Mistake 1: My Photos Are Too Dark!
Problem: You've hit the limit of your lens's aperture and available light.
Solution: Raise the ISO, use a wider aperture lens, or add more light to the scene. A prime lens like a 50mm f/1.8 can be an affordable game-changer for low light situations.
Mistake 2: My Subject is Sharp, But the Background is Distracting
Problem: You're controlling motion well, but not your depth of field.
Solution: This is where Aperture Priority mode becomes your next tool to master. Once you've conquered shutter speed, learning to control background blur is the natural next step.
Shutter Priority vs Other Modes
Understanding where Shutter Priority (S/Tv) fits among your camera's main shooting modes helps you choose the right tool for the job.
Full Auto Mode ('Auto' or Green Square)
The camera makes all decisions. Perfect for simplicity but offers no creative control over motion or background blur.
Shutter Priority Mode (S or Tv)
You control the shutter speed to manage motion, and the camera assists with exposure. Ideal for wildlife photography where motion control is paramount.
Aperture Priority Mode (A or Av)
You control the aperture to manage depth of field, while the camera sets shutter speed. Perfect when background blur is your main creative goal.
Manual Mode (M)
You control everything. Maximum creative freedom but requires solid understanding of exposure principles.
Ready for More Control? Transitioning to Manual Mode (M)
Once you're comfortable using Shutter Priority, you might feel ready for complete creative control: Manual Mode (M).
Your experience with S/Tv provides a fantastic foundation. You've practiced controlling shutter speed while observing how the camera adjusts other settings.
A Helpful Stepping Stone: Use Auto ISO in Manual Mode. This allows you to set both your desired shutter speed (for motion) and your desired aperture (for depth of field), while the camera automatically adjusts ISO for correct exposure.
Advanced Technique: The Panning Shot
Panning involves using a slower shutter speed while moving your camera smoothly with a moving subject. Done correctly, this creates a sharp subject against a beautifully blurred background that conveys speed and motion.
This advanced technique requires precise practice and timing, but the results can be stunning when mastered.
Capturing the Moment with Confidence
Learning to effectively use Shutter Priority mode is a key step in moving beyond automatic settings and truly taking creative control of your wildlife photography.
By understanding how to dictate shutter speed to capture motion exactly as you envision it, and seeing how it interacts with aperture and ISO, you're building the foundation for more impactful images.
But the real learning happens out in the field! Take this knowledge, grab your camera, and head out to your favourite nature spot. Experiment with freezing those split-second moments, play with creating beautiful motion blur, and most importantly, enjoy the process.
Let your passion for nature shine through in every action-packed, perfectly timed shot you capture!
About the Author
I’m a wildlife photographer who learns on everyday walks. This site is my field notebook: practical photo tips, gentle ID help, and walk ideas to help you see more—wherever you are.
I write for people who care about doing this ethically, who want to enjoy the outing (not stress about the gear), and who'd like to come home with photos that match the memory — or at least the quiet satisfaction of time well spent.
Step Behind the Wild Lens
Seasonal field notes from my wildlife walks: recent encounters, the story behind favourite photos, and simple, practical tips you can use on your next outing.
Explore More Nature Walks, Wildlife and Photo Tips
Find out how to make a dark photo brighter in camera
Discover how to make a dark photo brighter in camera, freeing up your editing time for creative flourishes instead of fixes
Beautiful Dragonfly Photos & Tips for Taking Your Own
Stunning dragonfly and damselfly photos from UK walks — plus where to find them, camera settings, and simple tips to capture your own sharp shots
How to Start Wildlife & Nature Photography | Beginner Field Shoot (UK)
Step-by-step beginner guide to wildlife and nature photography — plan your first field shoot, camera checklist and local reserve tips from Carol Leather.


Copyright © 2018- naturewalkswithcarol.com All rights reserved
Home. | About Me | Contact Me | Blog | Privacy Policy