- Home
- Photo Basics
- Accessories
- Make a Dark Photo Brighter
How to Make a Dark Photo Brighter
Preventing Dark Photos in Wildlife Photography
You're in the wild, lined up for what seems like the perfect shot.
But when you check the image, it's too dark—lacking the detail and sharpness you hoped for.
It’s frustrating but common in wildlife photography. Dense woodland, overcast skies, and active animals can all lead to underexposed photos that miss the mark.
The good news? You can conquer tricky lighting before you even press the shutter. With the right in-camera techniques, you’ll capture bright, sharp wildlife shots, even in tough lighting conditions.
In this guide, you'll learn how to adjust key camera settings on the fly to maximise available light. Master these, and you’ll be ready for anything nature throws at you.
Camera Settings to Prevent Underexposure
Wildlife photography often comes down to quick adjustments as the light shifts.
The key is understanding the exposure triangle—aperture, shutter speed, and ISO.
Let’s look at how each can help you avoid dark photos in challenging environments. By mastering these settings, you can effectively fix dark photos before they even happen.
1. Aperture: Let in the Light
When light is scarce, your aperture is your first tool for brightening the image. A wide aperture (low f-stop, e.g., f/2.8 or f/4) lets in more light, brightening your shot while maintaining a fast shutter speed to freeze motion.
If you don’t have a wide-aperture lens, don’t worry—there are other ways to boost exposure.
Try shooting just after the golden hours of early morning or before dusk, and increase your ISO or use positive exposure compensation. This combo may help you achieve a bright, sharp image, without needing expensive gear.
2. Shutter Speed: Balancing Light and Motion
Shutter speed controls how long your camera’s sensor is exposed to light. Faster speeds like 1/1000 sec freeze action, perfect for wildlife on the move, but they also let in less light.
The challenge is balancing light and motion.
If your subject is relatively still, you can afford to slow down the shutter speed, letting in more light and preventing underexposure. For fast-moving subjects like birds in flight, you'll need to keep the speed high but may need to increase ISO or use exposure compensation to keep the shot bright.
For example, capturing a bird in flight? Start with 1/1000 sec, but if the light isn’t ideal, slightly reduce the speed or bump up the ISO to maintain a well-exposed image.
3. ISO: Your Low-Light Lifesaver
When the light is fading, ISO becomes your best friend. ISO controls your camera’s sensitivity to light, so increasing it helps brighten your photos without needing to adjust the aperture or shutter speed.
However, be mindful of noise—grainy artifacts that can appear at high ISO levels. Newer cameras handle higher ISOs well, so don't be afraid to push it higher when necessary.
A good starting point for dawn or dusk wildlife shots is ISO 800, and if conditions get really dim, feel free to push to 3200 or beyond. Just keep an eye on noise levels and adjust as needed.
4. Exposure Compensation: Correcting for Tricky Lighting
Even when you’ve dialed in your aperture, shutter speed, and ISO, your camera’s light meter might underexpose the scene.
This is common when shooting backlit subjects or scenes with strong contrasts, like a bird against a bright sky.
Exposure compensation allows you to manually brighten your image by adjusting the meter’s reading. For backlit subjects, try adding +1/3 to +1 stop of exposure compensation to balance the light and ensure your subject pops without overexposing the background.
Mastering exposure compensation will help you get perfectly lit wildlife shots, even when the camera’s meter struggles with tricky light.

Case Study: Capturing a Kestrel in Low Light
Imagine you’re on the Northumberland moors, and a kestrel lands on a nearby post. The light is fading fast, and you only have seconds to act. This happened to me while shooting with a Canon 5D Mark IV and a 100-400mm lens.
With little time to adjust, I cranked my ISO to 5000, set my aperture to f/8, and kept my shutter at 1/500 sec.
The high ISO brightened the image just enough to overcome the fading light, and while the bright sky fooled the camera’s meter slightly, the exposure was still usable.
The lesson? Don’t be afraid to push your ISO when the light is low.
It’s better to have a slightly noisy image than a dark, unusable one. In low-light wildlife photography, getting the shot is the priority, and small adjustments like slowing the shutter or bumping exposure compensation can make all the difference.

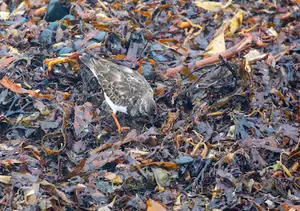
Case Study: Dealing with High-Contrast Scenes
In woodland or dappled light, your camera’s meter may struggle with high contrast.
Spot metering lets you focus the exposure on your subject rather than the entire scene, ensuring the main subject is correctly lit.
For instance, while photographing a bullfinch in the woods, I used spot metering to lock exposure on the bird, allowing the surrounding shadows to fall naturally without affecting the subject’s exposure. A small bump of +1/3 stop exposure compensation helped lift the bird’s colors without blowing out the background.
When you’re working with high-contrast scenes, spot metering can be your best ally in preventing underexposure and keeping your subject bright and sharp.

Case Study: Backlit Bird Photography
Backlighting can create stunning halo effects, but it also risks turning your subject into a silhouette. I faced this challenge when photographing a long-tailed tit against the sun.
To avoid underexposure, I dialled in +2/3 stop of exposure compensation and set my ISO to 1000, ensuring enough light reached the sensor. This illuminated the bird’s delicate features without overexposing the bright background.
When shooting backlit wildlife, remember to use exposure compensation to balance the lighting. A quick tweak can transform your shot, capturing both the beauty of the light and the detail of your subject.

Unlock Brighter Wildlife Photos with ETTR
ETTR, or "Expose to the Right," is a technique that involves deliberately overexposing your shot slightly to capture more light.
By pushing the histogram toward the right (without clipping highlights), you reduce noise in the shadows and gain more detail to work with in post-processing.
ETTR is especially useful when shooting in RAW format, where you have more flexibility to adjust shadows and highlights later. When the light is tricky—like in deep shade or during golden hour—ETTR can help preserve important details in both the highlights and shadows.
To use ETTR effectively, shoot in manual or aperture priority mode, check your histogram, and adjust exposure compensation to push it slightly to the right. Just be careful not to overexpose too much, or you’ll lose detail in the brightest parts of your image.
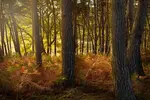
Lighting Challenges in Wildlife Photography
As a wildlife photographer, you're often at the mercy of natural light. From the soft glow of dawn to the harsh light of midday, it’s essential to adjust your camera settings to the conditions at hand.
Let’s look at how to handle different lighting scenarios and prevent dark photos.
1. Golden Hour Magic: Soft Light, Big Impact
Golden hour—the soft, warm light right after sunrise or before sunset—is a favorite for wildlife photographers. But while this light is beautiful, it’s also low, which can lead to underexposure if you're not careful.
To make the most of golden hour, open your aperture almost as far as it will go, to let in more light, and don’t hesitate to bump up your ISO (starting at 800) to keep your shutter speed fast enough for wildlife movement. For quick-moving animals, aim for a shutter speed of 1/500 sec or faster to avoid blur while keeping the image bright.
For example, while photographing a hare in the early morning, I was using a Sigma 150-600mm lens with a maximum aperture of f6.3 at the long end. I set a shutter speed of 1/800th in case he moved, which needed an ISO of 6400.
By using these settings, I captured the scene’s soft light while maintaining enough brightness for detail.

2. Midday Sun: Taming Harsh Light
Midday light can be harsh, creating strong shadows and blown-out highlights. To prevent underexposure in shadowed areas, use a bit of positive exposure compensation (+1/3 to +2/3 stop) and rely on spot metering to focus the exposure on your subject rather than the overly bright background.
Additionally, if you're close enough, consider using a reflector to bounce light back onto your subject, softening harsh shadows. While it’s tempting to avoid shooting in the midday sun altogether, these techniques can help you get balanced, well-lit shots even in the most challenging light.
For instance, I was photographing a ringed plover at Grafham Water at noon on a sunny September day.
Again I had the Sigma 150-600mm on the camera, and metered off the bird's mid-tone feathers.
I opened the aperture to f7.1, which meant I needed a high shutter speed to prevent OVERexposure in this instance. Dropping the exposure comp down to -1/3 stop helped here. The shadow on the rock still retains detail.

3. Woodland Wonders: Managing Dappled Light
Woodlands create beautiful but tricky lighting conditions with patches of light and shadow. Your camera’s meter may struggle, often underexposing your subject.
To handle this, increase your ISO to around 1600 and use spot metering, if necessary, to lock exposure on your subject. You can also dial in +1/3 or +2/3 stop of exposure compensation to lift shadows without blowing out the highlights.
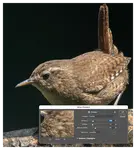
For example, while photographing a wren in the woods, I used ISO 1600, f9.0 and 1/500th to ensure the bird wasn't too dark and the brighter spots weren't overexposed. A delicate balance, and I think spot metering would have helped.

4. Overcast Days: Diffused Light, Subtle Adjustments
Overcast skies act like a giant softbox, creating even, diffused light that’s ideal for wildlife photography. However, the light levels may be lower, so you’ll need to increase your ISO (1600 or higher) and open up your aperture to avoid underexposure.
Additionally, using a bit of positive exposure compensation will help brighten your subject, especially when the background is brighter than the subject.
When photographing this sanderling on the beach I had a white bird, pale sand and light sea to contend with. Seeing all those bright tones, the camera tried to darken things to a 50% grey.
I had to add +2/3 stop to ensure it stayed bright enough and bump the ISO up to 1000.

Post-Processing Magic: Rescuing Dark Photos
Even with careful planning, some wildlife photos may come out too dark due to unpredictable lighting.
This is where post-processing comes in.
1. RAW Power: The Best Tool for Rescuing Dark Photos
Always shoot in RAW format if you want maximum flexibility in post-processing.
RAW files capture more detail and a wider dynamic range, allowing you to recover lost highlights or brighten shadow areas without losing quality. Think of it as your safety net for when the light isn’t ideal.
2. Expose the Truth: Rescuing Dark Photos in Post
If your wildlife photo is darker than you’d like, post-processing can make a world of difference.
Start with the exposure slider, a simple but powerful tool for brightening your image. Adjust it slowly to bring your subject out of the shadows, but avoid pushing it too far, as this can wash out highlights and introduce unwanted noise.
Next, use the shadows slider to recover details from the darkest parts of the photo. Wildlife photography often involves tricky lighting, and this step helps reveal important textures in fur, feathers, or foliage without over-brightening the rest of the image.
A good rule of thumb: adjust the overall exposure first, then fine-tune with the shadows slider. This approach preserves the balance between light and dark, allowing your subject to stand out naturally.
3. Crank Up the Contrast: Make Your Subject Pop
Once you’ve brightened a dark photo, increasing contrast can add depth and make your subject pop.
However, be cautious. Too much contrast can result in harsh images with blown-out highlights or deep, detail-less shadows. Adjust it just enough to separate your subject from the background and give the photo more energy without losing natural details.
A useful tip: while adjusting contrast, pay attention to the background. In wildlife photography, a cluttered background can distract from your subject. Increasing the contrast between a bright subject and dark background can sometime help to disguise any slight distractions.
4. Tame the Highlights: Recover Overexposed Details
Sometimes, bright areas in your wildlife photos—like the sky or sunlit fur—become overexposed.
To fix this, drag the highlights slider down to bring back details in the brightest parts of your image. This tool helps you recover textures that might otherwise appear as a solid white patch.
For extreme cases, the whites slider can also be helpful, letting you fine-tune the very brightest parts of your image to restore more detail. The goal is to create balance, preserving the brightness of the highlights without losing important detail.
Start with the highlights, then move to the whites if necessary, and avoid overcorrecting, as it can make your photo look flat or unnatural.
5. Banish the Grain: Reducing Noise for Crisp Wildlife Photos
After brightening an underexposed image, you may notice noise—grainy artifacts that appear, especially in high ISO images. Noise reduction tools in programs like Lightroom can help clean up your image, smoothing out the grain while keeping your subject sharp.
Be careful not to go overboard, as too much noise reduction can make your photo look soft or smudged, especially around fine details like fur or feathers. Adjust it just enough to reduce visible grain while maintaining clarity in your subject.
The key is to strike a balance, keeping the image crisp without losing the natural texture and detail that make wildlife photos captivating.
6. Try Selective Brightening with Curves and Levels
For more targeted adjustments, curves and levels tools allow you to brighten specific areas of your photo without affecting the whole image.
This is particularly useful in high-contrast wildlife photos, where your subject may be in shadow while the background is well lit.
Curves let you fine-tune the tonal range, adjusting shadows, mid-tones, and highlights independently. You can brighten your subject while keeping the background intact, making the subject stand out against the scene.
Using curves and levels gives you precise control over brightness and contrast, helping you achieve the perfect balance between your subject and its surroundings.
Congratulations!
You now have the tools to tackle lighting challenges in wildlife photography.
From in-camera settings like aperture, shutter speed, ISO, and exposure compensation to post-processing tricks like using RAW files and adjusting shadows, contrast, and highlights—you’re ready to tackle any lighting condition.
Remember, mastering light is both a technical skill and an art form.
Practice adjusting your settings on the fly and fine-tuning images in post-production to bring your wildlife photos to life. Each lighting scenario presents a unique opportunity to tell a story, so don’t shy away from experimenting.
With these techniques in your arsenal, you’ll be able to capture stunning, well-exposed wildlife images, no matter what nature throws your way.

I've spent over 30 years walking and photographing UK wildlife, with work featured in Canon EOS Magazine and a Wildlife Trusts calendar. I still learn something new on most outings.
This site is my field notebook full of photo tips, help on identifying what you see, and how to decide where to walk.
Step Behind the Wild Lens
Seasonal field notes from my wildlife walks: recent encounters, the story behind favourite photos, and simple, practical tips you can use on your next outing.
Explore More Nature Walks, Wildlife and Photo Tips
Woodland Photography Tips for Beginners: A UK Autumn Walk
Simple woodland photography tips for beginners — camera settings, composition and phone-friendly ideas from a real autumn walk in the UK.
A Histogram in Photography - How to Read and Interpret It
Learn the vital role of a histogram in photography to achieve correct exposure, so you can adjust for underexposed or overexposed shots with confidence
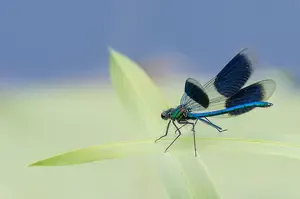
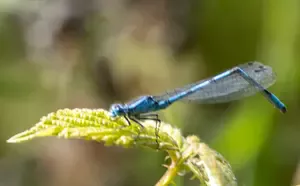
Dragonfly Pictures: Beautiful Close-Up Photos & How to Take Yours
Close-up dragonfly and damselfly images from UK nature walks — chasers, darters, hawkers and demoiselles. Where to find them, plus photography tips.


Copyright © 2018- naturewalkswithcarol.com All rights reserved
Home. | About Me | Contact Me | Blog | Privacy Policy