- Home
- Photo Basics
- Accessories
- Low Light Wildlife Photography
Low Light Wildlife Photography
I remember the feeling perfectly.
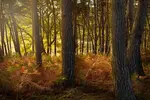
My camera felt like a lead weight in my bag. I was walking through the woods, the air thick with the gloom of a damp May morning, and a knot of dread was tightening in my stomach.
This was supposed to be the moment. The "golden hour" was over, leaving just a flat, challenging light. I wanted to prove to my husband that my news lens was a valid expense and would improve my photos. But so far I hadn't taken a single frame. I felt like a failure. Another wasted morning. Maybe low light wildlife photography was too difficult for me?
If you've ever felt that disappointment. All the effort of getting out of the house early only for the weather to have not got the telegram, then you will understand how I felt.
But little did I know that things were about to change.
The Story Begins with a Shadow
My destination was Fowlmere, hoping to catch the early birds in the golden light. But the light was poor, and the reserve was dead, or so it felt. I was deep among the trees, feeling despondent.
"I'm hopeless. What a total waste of time!"
I've always said if your original plan fails, not to give up. Instead I slow down, stay in one place instead of wandering aimlessly. So I headed for the hide and sat listening to the spring bubbling in the stream, watching the reeds waving in the cool breeze, feeling alone and if I'm truthful, a bit bored.
Should I pack up and go home with my tail between my legs?
I caught a movement out of the corner of my eye. Just above the bubbling water a shadow. Probably nothing but worth watching for a moment.
I didn't see it materialise but there was suddenly a fallow deer on the edge of the water, drinking. My eyes focused and I realized it wasn't alone.
My heart hammered against my ribs. I didn't dare move, but I wanted to record the scene.

I Hardly Dared Move
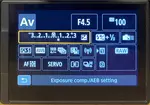
With my camera still in my lap, set to Aperture Priority and f/9, just in case a kingfisher had deigned to appear, I didn't have time to fiddle with the controls.
Ever so slowly I raised it to my eye, hoping the noise of the shutter wouldn't scare them away. I glanced at the ISO to see it was an Auto, so the camera would take care of it for me. One less thing to worry about.
With the low light it was going to need a high ISO and at f/9 the shutter speed was going to be slow too. A good job I could lean my elbows on the shelf inside the hide.
All these thoughts rushed through my head as I focused on the deer, hardly daring to breathe as I pressed the shutter.
Click!

A branch cracked as the deer raised their heads. I kept frozen to the spot. Could they see me? I was wearing dark clothes and sitting inside in the shadows, so hopefully that hid me from them.
They settled down to drink again. I let out my breath. I took 3 more photos before they disappeared as silently as they had arrived.
A few moments later the hide door opened and another photographer crept in quietly. We smiled and he nodded in the direction the deer had been standing.
"From your expression I would imagine you saw them," he said. I nodded, unable to speak, emotions running so high.
He laid his camera complete with monstrous lens on the shelf, and went on to explain he had caught sight of them before reaching the hide and had stopped and watched. They were too close for him to take photos!
Finding Joy in the Noise When Editing
Back at my computer, I zoomed in on the images.
Were they noisy?
Absolutely. At ISO 12800, the grain is obvious. They are not technically perfect. But they are honest. They feel like the moment felt when I looked into the deer's eyes not knowing whether they were looking at me in return. Quiet. Intimate. Even magical.
I don't mind the grain. It adds to the atmosphere of that murky morning.
They sheer joy of seeing the deer and proving to myself I wasn't a failure at low light wildlife photography, was all that mattered.
Yes, I will admit to a tiny bit of editing after the fact. In truth nearly all wildlife photos need a little polish. But my goal wasn't to eliminate the noise.
I wanted anyone else that looked at my pictures to also have to look closely, just as I had to do, in order to spot the magic.
I confess I hadn't noticed in the excitement of the moment that I had managed to capture a perfect relection in the water!

More pages from my Notebook
Ready to practice low light photography under a tree canopy? Follow the woodland photography cheat sheet.
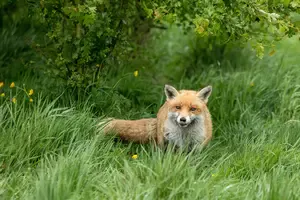
See another morning where I had a fleeting encouter with a different species of deer.

I've spent over 30 years walking and photographing UK wildlife, with work featured in Canon EOS Magazine and a Wildlife Trusts calendar. I still learn something new on most outings.
This site is my field notebook full of photo tips, help on identifying what you see, and how to decide where to walk. About Me.
Step Behind the Wild Lens
Seasonal field notes from my wildlife walks: recent encounters, the story behind favourite photos, and simple, practical tips you can use on your next outing.
Explore More Nature Walks, Wildlife and Photo Tips
Why Won't My Camera Focus? Simple Fixes From a Wildlife Photographer
Frustrated by blurry photos? A simple checklist of focus fixes that work in the field and beyond — from common rookie mistakes to settings you may have missed.
Aperture, Shutter Speed and ISO Explained (With Wildlife Examples)
What does aperture actually change? Why does shutter speed matter? See how each setting transforms your photos, with real wildlife examples from the field.
Golden Hour Photography Tips | Settings, Timing & Composition
Golden hour photography tips that work. Camera settings, timing, composition and practical techniques for capturing warm, beautiful light outdoors.


Copyright © 2018- naturewalkswithcarol.com All rights reserved
Home. | About Me | Contact Me | Blog | Privacy Policy