- Home
- Start Here
- Nature Walk Checklist
Nature Walk Checklist: What to Wear, Pack and Remember
This is what I actually take on a nature walk. Not what a gear catalogue says you should buy, but the things that, after years of getting it wrong, I have found make the difference between a comfortable day and a miserable one.
Most of my walks are in local parks, nature reserves, and along country paths in the East of England. If that sounds like your kind of outing, this list will serve you well.
Quick checklist
Use this before an ordinary local walk. No specialist gear needed.
☐ Walking boots (broken in)
☐ Warm, moisture-wicking socks
☐ Layers: base, mid, waterproof outer
☐ Water bottle
☐ Snack
☐ Phone (charged)
Useful if you have room.
☐ Hat and gloves
☐ Small daypack
☐ First aid kit
☐ Insect repellent (summer)
Optional extras
☐ Binoculars (even a cheap pair)
☐ Walking pole
☐ Notebook or phone notes app
☐ Sit mat
☐ Lens cloth
First time out? Start with Nature for Beginners for a guided path from first outing to confident observer.

Footwear
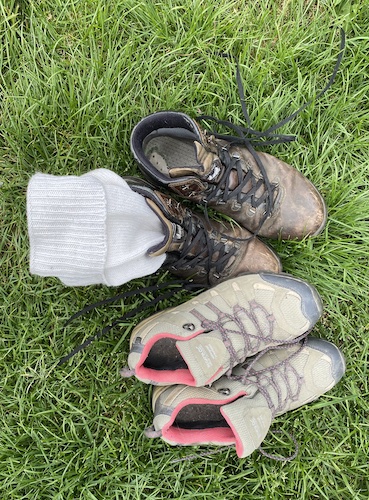
Our walking boots and thick socks. Nothing fancy, but they have never let us down.
This is the one thing worth spending money on. Everything else can be improvised, but cold, wet, blistered feet will ruin any walk.
You do not need expedition-grade boots. For most UK nature walks, a pair of mid-cut walking boots with decent grip and some ankle support is plenty. Waterproofing matters more than you think, even in summer, because paths through reserves are often muddy, and long grass holds moisture.
Socks matter almost as much as boots. Thick, moisture-wicking socks prevent blisters and keep your feet warm. I use Darn Tough or Smartwool wool-blend socks and they last for years. (affiliate links)
Break them in first
New boots on a nature walk is a recipe for blisters. Wear them around the house and on short errands for a week before taking them out properly.
Clothing
The British weather changes its mind constantly, so dressing in layers is the simplest way to stay comfortable.
- Base layer: A breathable top that wicks moisture. Cotton gets cold when damp, so synthetic or merino wool is better.
- Mid layer: A fleece or lightweight jumper. This is the one you take off and put back on three times during a walk.
- Outer layer: A waterproof jacket. It does not need to be expensive, but it does need to actually keep the rain out. Check that the seams are sealed.
For wildlife watching, muted colours help. You do not need full camouflage, but a brown or green jacket is less likely to startle birds than a bright red one. My husband and I both wear Jack Pyke jackets with a camouflage pattern and plenty of pockets, but any muted-colour jacket with a few pockets will do the same job.
The hat and gloves rule: If there is any chance of cold or wind, pack a hat and thin gloves. Standing still to watch wildlife is much colder than walking. You will be glad of them within ten minutes of stopping.
What to Carry It In
A small daypack is all you need. Something around 15-20 litres is enough for a water bottle, a snack, your waterproof layer, and any camera gear.
If you are carrying a camera, a bag with a padded compartment saves you worrying about it getting knocked. But for most walks with a phone camera, any comfortable rucksack will do.
Food and Water
Even on a short walk, take water and something to eat. Standing in a hide for an hour waiting for a kingfisher is thirsty work, and hunger has a way of cutting a good walk short.
A reusable water bottle and a couple of snacks is enough for most outings. Trail mix, a cereal bar, a banana, whatever works for you.
If you have specific dietary needs, pack your own food rather than hoping a reserve cafe will have what you need. I have diabetes and need to manage my blood sugar carefully, so I always carry something I know is safe, even on a walk I expect to be short.
Finding Your Way
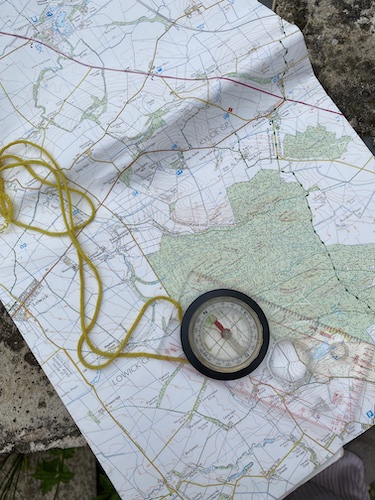
A compass and Ordnance Survey map. Old-fashioned, but they never run out of battery.
For most nature reserve walks, the paths are well-marked and you will not need a map. But if you are walking country paths, bridleways, or exploring somewhere new, a few simple precautions help.
- Make sure your phone is charged. OS Maps or Google Maps will get you out of most situations.
- Screenshot your route before you leave, in case you lose signal.
- If you enjoy longer walks, an Ordnance Survey paper map of your area is worth having. They are satisfying to use and never crash.
Tell someone where you are going and roughly when you expect to be back. A quick text is enough.
First Aid
A small first aid kit lives in my daypack permanently. I rarely use it, but when I need a plaster or an antiseptic wipe, I am always glad it is there.
The essentials: plasters (including blister plasters), antiseptic wipes, a small bandage, safety pins, and any regular medication you take. If you use an inhaler or carry an EpiPen, make sure it is in your bag, not on the kitchen table.
In summer, insect repellent is worth packing, especially near water. Midges near lakes and reservoirs can be relentless.
Useful Extras
None of these are essential, but they improve the experience:
- Binoculars. Even a cheap pair opens up wildlife watching enormously. You do not need to spend hundreds of pounds to start.
- A walking pole. Helpful on uneven ground, especially if your knees are not what they were. Some photographers use a monopod that doubles as a walking stick.
- A notebook or phone notes app. For jotting down what you saw, where, and when. This is how local knowledge builds up over time.
- A sit mat. A small foam mat means you can sit on damp logs, cold benches, or the ground without regretting it.
- A lens cloth. Whether you are using a phone or a camera, a clean lens makes a surprising difference to your photos.
Look After the Place You Visit
This matters more than any piece of kit.
Take everything home with you. Food wrappers, tissues, water bottles, all of it. Wildlife can become tangled in litter, and birds sometimes weave plastic into their nests, which injures their chicks.
Stay on the paths where they are marked, especially during nesting season from March to July. Ground-nesting birds like skylarks and lapwings are easily disturbed, and once an adult is flushed from a nest, predators move in quickly.
If you come across nesting birds or animals with young, watch from a distance. Getting too close can cause a parent to abandon the nest, or worse, draw a predator's attention to it. A keen photographer once told me he crept close to a nest for a better shot, only to watch a fox take the eggs moments after the adult bird fled.
And while our wildlife is generally harmless, mute swans are the exception. They are fiercely territorial, especially near their nests, and will even attack their own kind. Give them space.
Do not pick wildflowers. Wildflower meadows in the UK have declined by 97% since the 1930s. Enjoy them where they grow. A photo lasts longer than a picked stem anyway.
Ready to Head Out?
Now you know what to pack, here is where to go next.
Nature for Beginners: Your Starting Point
A guided path from first outing to confident observer, including what to notice, how to identify what you see, and simple photo advice.
Local routes with realistic expectations: what you might see, where to stand, when to go.
How to Slow Down on a Wildlife Walk
The practical side of walking at nature's pace, and how to stop worrying about what other people think.


Step Behind the Wild Lens
Seasonal field notes from my wildlife walks: recent encounters, the story behind favourite photos, and simple, practical tips you can use on your next outing.
Copyright © 2018- naturewalkswithcarol.com All rights reserved
Home. | About Me | Contact Me | Blog | Privacy Policy