- Home
- Photo Basics
- Accessories
- How to Use a Bean Bag
How to Use a Bean Bag in a Hide for Better Stability With Long Lenses
Last updated: March 2026 · By Carol Leather
When you're new to using a public bird hide, it's normal to feel self-conscious as you walk in and get set up. You may not know whether tripods are allowed, and setting one up quietly in a confined space can be awkward anyway. A photographer's bean bag is a simple alternative that can help you get sharper photos by supporting a long lens steadily on the hide shelf.
You do not need specialist gear to try this on your next visit. A basic bean bag, a long lens, and five minutes of setup is all it takes.
Bean bag in a hide: at a glance
| Hide problem | Best support | Why | Trade-off |
|---|---|---|---|
| Shelf at window height | Flat bean bag | Lens sinks in, stays put | None. This is the simplest setup |
| Shelf lower than the opening | U-shaped bean bag | Raised sides add height | Less stable than a flat bag on a good shelf |
| Shelf much too low | Camera bag + bean bag stacked | Extra height when nothing else works | Less stable, more awkward |
| Cramped hide, other people | Bean bag (any type) | Small footprint, quiet, no trip hazard | Less stable than a full tripod |
| Long lens, front-heavy | Tripod foot on the bag | Weight over the balance point stops tipping | Needs a lens with a tripod collar |
Quick setup: five steps to a steady shot in a hide
- Check your bean bag is not too full. The lens should sink into it, not balance on top.
- Rest the tripod foot on the bag, not the end of the lens. The tripod foot is the small bracket underneath many long lenses. If your lens does not have one, rest the camera and lens on the bag close to the camera body rather than at the front of the lens.
- Tuck your elbows into your sides, or rest them on the hide shelf.
- Keep the front end of the lens inside the hide opening.
- Set up before the action starts. Point the lens at a likely perch or feeding spot and wait.
For photography in public hides, a bean bag can be a better choice than a tripod. It is quieter, takes up less room, and avoids the awkwardness of setting up legs in a cramped space. The key is where you place the lens on the bag. Rest it near the balance point, close to the camera body or on the tripod foot, and you get a steady platform that can give you sharper results than handholding.

Where to place the bean bag for maximum stability
Hide shelves can vary in both width and height. Some sit almost level with the window or opening, while others are much lower. The type of bean bag that works best depends on what you find when you get there. So be prepared to get it wrong on the first visit. When you return you will have that added knowledge.
Flat bean bag
Works well when the shelf is close to window height. The lens sinks in and stays put. This is the simplest and most stable option in most hides.
U-shaped bean bag
Designed mainly for car windows, but the raised sides can give you extra height when the shelf is lower than the opening. Less stable than a flat bag on a good shelf, but useful when you need to make up a few inches.
Camera bag underneath
If neither works, placing your camera bag on the shelf with the bean bag on top can give you the height you need. It is less stable and more awkward, but it is better than handholding.
You also need to watch out for the uprights between the panes or openings. They can stop you swinging the lens far enough to follow a moving bird or animal. I have lost count of the number of times mine has banged into the wood, usually followed by a muttered word or two.
Ideally keep the glass end of your lens (sometimes called the front element) inside the hide. If it is sticking beyond the opening it may disturb your subject and also irritate your fellow hide occupants if your lens appears in their sight line, especially if at that moment their subject appears. If your lens hood makes this difficult, remove it. It is better to have the lens inside the opening without a hood than sticking beyond it with one.
Positioning your bean bag needs some thought.
If the shelf is deep, you may have enough room to stabilise the support using your elbows and the bean bag to create the three points of contact a tripod provides.
Whether to rest the lens foot or the lens barrel on the bag
This is the single most important thing to get right, and it is where most people start off wrong (myself included).
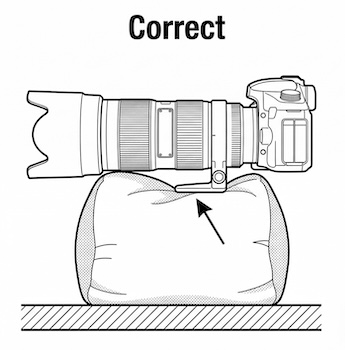
Correct: tripod foot on the bag, weight balanced
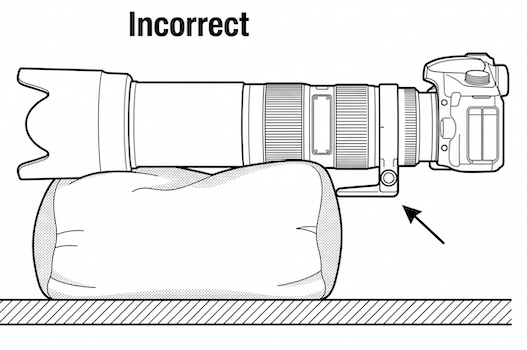
Incorrect: barrel resting on bag, foot not used
When I first began using a bean bag I would softly cradle the lens barrel on it, with the tripod foot floating in mid air. This way I was supporting the weight of the lens and camera making it more difficult to hold steady.
Then I decided to take off the removable tripod collar (the ring that the foot attaches to) before leaving home, thinking that if I wasn't attaching my lens to a tripod, that extra weight was unnecessary. In fact, by balancing the weight of the lens on the collar it is less likely to topple forward.
Once I learned that placing the foot on the bean bag instead was the best solution, it became easier to use and resulted in sharper photos. With the weight resting on the foot rather than the front of the lens, the downward force sits over the balance point. That is what stops it tipping forward.
How to position your body inside a hide for a steadier shot
Either support your elbows on the shelf, if possible, or tuck them into your sides to get steadier shots. Face the opening head on, not at an angle, as this will help you track your subject by twisting at the waist and making it less likely that you lose your stability.
Keeping the camera as low as possible will help with composition, but think of your back and shoulders. If you are uncomfortable or in pain that will distract you from your photography, and you will definitely know about it later. Something that can put you off using the bean bag next time.
If you are planning a long session, bring a thin cushion, shift position between bursts of activity, and stand up to stretch when the hide is quiet. Tired muscles shake, and that shows in your photos.
Common mistakes that make hide shots less sharp
Bean bag too full
If the bag is overfilled, your lens is resting on a bouncy surface rather than sinking into it. That introduces minor movements, enough to cause a loss of sharpness. Remove some of the filling so that the lens foot embeds into the bag, not perches on the top of it.
Resting the lens barrel on the bag instead of the tripod foot
The lens is front-heavy, so supporting it along the barrel leaves the weight pulling forward. Rest the tripod foot on the bag instead, so the downward force sits over the balance point.
Lens sticking out beyond the hide opening
If the front element pokes past the window, it may disturb wildlife and irritate other hide users. Position the bean bag so the lens stays inside. If you cannot manage that, try angling slightly rather than pushing the lens further out.
Last-minute adjustments when a bird appears
Scrambling to reposition when the action starts causes wobble and noise. Set up before the action starts, with your lens pointing at a likely perch or feeding spot, and wait.
When a bean bag is better than other supports in a hide
If space is minimal, putting up a tripod inside a hide can be problematic and insensitive to other occupants. It can also be a trip hazard, and if someone else accidentally knocks into your set up that could be annoying and even expensive.
Keeping to a small footprint by using a bean bag is a good solution. It is unlikely to take up any more space than your body does already by sitting there.
Before you start shooting: a quick check
- Bean bag not too full
- Lens foot or camera body resting on the bag, not the front of the lens
- Front element inside the hide opening
- Elbows supported or tucked in
- Lens pointing at a likely spot before anything appears
- Comfortable enough to stay still for a while
Common questions about using a bean bag in a hide
Can I use a bean bag if my lens does not have a tripod foot?
Yes. Rest the camera and lens on the bag close to the camera body rather than at the front of the lens. The idea is the same: keep the weight over the balance point so the setup does not tip forward.
Flat bean bag or U-shaped?
A flat bag is more stable and works well in most hides where the shelf sits close to window height. A U-shaped bag is better when the shelf is lower than the opening, because the raised sides give you extra height. If you only buy one, start with a flat bag.
What if the shelf is too low for either type?
Place your camera bag on the shelf with the bean bag on top. It is less stable and more awkward, but it is better than handholding a heavy lens for a long session.
Should I remove my lens hood in a hide?
Only if the hood pushes the front of the lens past the hide opening. It is better to have the lens inside the opening without a hood than sticking beyond it with one. If the lens fits comfortably inside, keep the hood on for protection.
How full should the bean bag be?
Not too full. The lens foot should sink into the bag, not perch on top of it. If the bag feels bouncy, remove some of the filling. You want the lens to settle and stay still, not wobble.
Try it at home first
After my first outing, I decided to try it out in private at home. I sat on a low stool and set up the bean bag on the windowsill. I took some photos with the lens supported and some handheld then pulled up the images on the computer. At first I couldn't see the difference, but with a bit of practice I was able to confirm that using the bean bag definitely resulted in sharper photos.
I found the hide configuration at Barnwell Country Park, just outside Oundle, to work well with my bean bag setup. The shelves sit at a good height for a flat bean bag, and the windows are wide enough to track birds moving along the lake edge.
If you have not tried a bean bag in a hide yet, it is worth practising at home first, just as I did. Once you have the feel for it, the next time you walk into a hide you will know exactly what to do.


About the Author
I've spent over 30 years walking and photographing UK wildlife, with work featured in Canon EOS Magazine and a Wildlife Trusts calendar. I still learn something new on most outings. This site is my field notebook: photo tips, help identifying what you see, and where to walk.
Step Behind the Wild Lens
Seasonal field notes from my wildlife walks: recent encounters, the story behind favourite photos, and simple, practical tips you can use on your next outing.
Copyright © 2018- naturewalkswithcarol.com All rights reserved
Home. | About Me | Contact Me | Blog | Privacy Policy