- Home
- Photo Basics
- Camera Settings
- Camera Settings for Wildlife Photography
How to Choose the Right Camera Settings in the Field
You know what aperture, shutter speed and ISO do. But standing in a hide at 7am with a kingfisher on the post, which one do you change first?
That's the gap this page fills. Not what the settings are, but how to choose them when it matters.
(New to camera settings? Start with What Do Aperture, Shutter Speed and ISO Actually Do? to get the foundations first, then come back here.)
The answer is a three-step habit: Pre-Visualise, Prioritise, Validate. Once it clicks, you'll stop guessing and start deciding.
The Field Framework That Closes the Gap
I’ve found that a simple way to close that gap is to decide what matters most to you before you touch the dials. Once you know what you're trying to capture, your camera settings will support that choice rather than fighting against it.
Most setting guides explain ISO, shutter speed, and aperture separately. In the field, that’s exactly how you end up chasing your tail.
Instead, this repeatable workflow translates “what you felt” into “what the camera needs”:

You don’t need to chase moments. You need to notice them — and choose the setting that protects what mattered.
Pre-Visualize → Prioritise → Validate
Pre-Visualise: What’s the photo meant to say? (sharp wings, soft mood, clean background, warm light)
Prioritise: Set the one thing you don’t want to compromise:
- Motion → shutter speed first
- Separation / story → aperture + your position next
- Brightness / noise → ISO last
Validate: Don’t trust the “pretty” look on the back of the camera. Check focus + histogram + highlight warnings, then adjust one thing.
Choose your moment (jump to the scenario that fits)
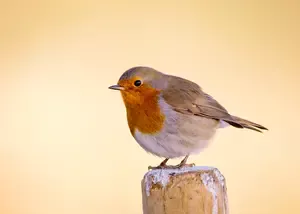
Birds in flight
Start with shutter speed, then let ISO do the heavy lifting.Dappled woodland light
Background and angle matter as much as exposure.Bird in shade, bright background
Your camera will “average” the scene unless you take the lead.Dusk wildlife
Protect sharp eyes first; accept a little noise.Pre-Visualize in 10 Seconds (Before You Change Anything)
This is the little pause that makes the rest easier. Before you adjust settings, try asking:
- What’s the moment? (a look back, a wing stretch, a chase, a quiet stillness)
- What’s the feeling? (crisp detail, soft intimacy, dramatic silhouette, warm glow)
- What’s most likely to spoil it? (motion blur, missed focus, busy background, blown highlights)
Then choose one “non-negotiable.” Something like:
- “I want the eye sharp.”
- “I want the wings crisp.”
- “I want a calm, soft background.”
- “I want to keep detail in those bright feathers.”
That one choice tells you where to start.
Prioritize: One Decision at a Time (So You Don’t Chase Your Tail)
Outdoors, things change quickly: a cloud moves, the animal turns, the background shifts as you take one step. I’ve found it helps to set settings in a practical order: motion first, then separation, then brightness.
If motion is the story, start with shutter speed
If your biggest disappointment is “it looked sharp when I took it,” you’re usually fighting shutter speed. Choose a starting point that matches movement, then adjust from there.
Gentle starting points (you’ll adjust for your light and your lens):
- Perched birds / calm animals: 1/250–1/500
- Feeding / head movement: 1/500–1/1000
- Running mammals: 1/1000–1/2000
- Birds in flight: 1/1600–1/3200
- Intentional motion blur (panning): 1/30–1/125 (this one needs practice)
If those shutter speeds sound “too fast for the available light,” don’t worry — that’s where aperture and ISO step in.
One small note from the long-lens end of wildlife photography: the longer your focal length, the more a ‘perfectly reasonable’ shutter speed can start to feel a little marginal — especially if you’re handheld.
In those moments, I’ll often protect shutter speed first, and let ISO rise to support it.

Handheld at 600mm from inside a hide: f/11, 1/800, ISO 6400 (0 EV). At long focal lengths, I’ll often take a little noise over a shutter speed that’s just a touch too slow.
If the photo feels busy, work on separation next
Aperture helps, but it’s only one part of separation. On walks, your position can matter just as much as your f-number.
To help the subject stand out, you might try:
- Increase the distance behind your subject: a bird on a branch with open sky behind will look calmer than one backed by tangled twigs.
- Shift your angle: one step left or right can turn chaos into a clean backdrop. Use a longer focal length if you have it: it tends to soften and simplify backgrounds.
- Open the aperture a little: f/4–f/6.3 is often a friendly range for wildlife (wide enough for blur, not so wide you lose too much depth).
- Watch the “too thin” trap: close up, very wide apertures can make the eye sharp but the beak or body soft.
If a photo looks flat, I’ll often try a tiny change of viewpoint before I change anything else. It’s the most underrated “setting” you have.


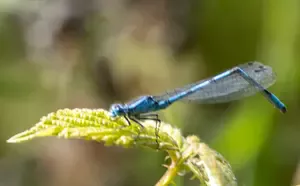
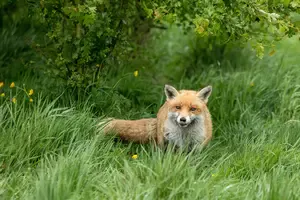
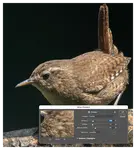
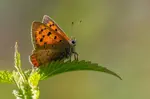
Left: A little distance behind the bird gives a soft, quiet background — it’s one of the simplest ways to make a subject feel three-dimensional.
Right: A clean patch of sky can work just as well. The background is simplified, but you may need a small exposure nudge to stop the bird going dull.
Then use ISO to pay for the choice you just made
Once shutter speed and aperture are supporting the moment, ISO is how you bring the exposure where it needs to be.
- If your shutter speed is slipping too slow, raise ISO (especially for moving wildlife).
- If noise is creeping in, see if you can open aperture a touch or find cleaner light by changing position — then lower ISO.
- If your camera allows it, Auto ISO can be surprisingly helpful on walks: you pick shutter + aperture, and the camera rides ISO as the light changes.
A lot of wildlife photographers (especially when things happen quickly) enjoy Manual exposure + Auto ISO because it keeps motion and depth of field steady while the camera handles the brightness housekeeping.
Two settings people forget: focus and drive mode
Sometimes the “flat” feeling is simply a missed focus moment — the background is sharp, the animal is a touch soft, and the whole frame loses life.
You might experiment with:
- Continuous/Servo AF for moving subjects, Single/One-shot for still ones
- A smaller focus area/point when there are branches in the way
- Burst/continuous drive for unpredictable moments (it helps you catch the exact head angle)
- RAW if you can — it gives you more room to bring back the tones you felt in the scene


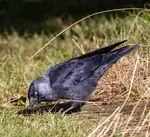
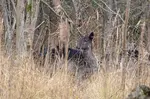
Left: Even in action, a bright ground can pull the exposure down and leave the hare looking flat. This frame was f/5.6, 1/1000, ISO 1000, +2/3 EV at 400mm (EF 100–400mm). If it still looks a touch dull, I’ll add a little more exposure and then check playback.
Right: Backlight feels luminous to our eyes, but the camera often ‘averages’ the brightness and turns the subject into a dark cut-out. This was f/5.6, 1/3200, ISO 1000, +2/3 EV at 400mm (EF 100–400mm). A quick playback check helps you keep the sparkle without losing the hare.
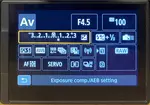
Validate: A Quick Check That Saves Disappointment at Home
The back-of-camera preview is affected by screen brightness and the light around you.
In bright daylight, a too-dark file can look fine.
In shade, a good file can look dull. A quick validation habit helps.
My “walk-friendly” validation loop
-
Zoom in on the eye (or the sharpest detail)
- If it’s soft, adjust your focus approach first.
- Check highlight warnings (“blinkies”) if your camera offers them
-
Glance at the histogram
- Pressed hard to the right can mean lost highlight detail.
- Piled on the left can mean crushed shadows.
- Adjust one thing (often ISO or exposure compensation), then shoot again
I try to keep validation calm and quick: focus, histogram, one adjustment — then back to watching the animal.
Field Scenarios (Step-by-Step, With the Reasoning)
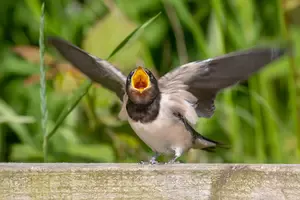
Scenario A — Birds in Flight (when sharp wings matter most)
On windy days, birds can look as if they’re almost hovering — beating hard just to hold their line. It’s a lovely thing to watch, and it’s also a reminder that “birds in flight” isn’t only about speed. It’s about how steady the whole moment is, including gusts and sudden changes of direction.
Try this approach:
- Pre-visualise: “I want crisp wings and a sharp eye.”
- Shutter first: choose a fast starting point (often 1/1600–1/3200 for small, fast birds; a little slower can work for larger birds or calmer flight).
- Aperture next: open enough for light, but don’t be afraid to stop down a touch if tracking is tricky (a little extra depth can be forgiving).
- ISO last: let ISO rise to protect the shutter speed you chose (Auto ISO can be very helpful here)
- Focus/drive: Continuous AF + burst; keep your focus area where you can reliably hold it on the head/upper body.
Photo moment: After a short burst, I’ll take a quick look in playback and zoom in on the eye. If it’s not quite there, I’ll usually nudge the shutter speed up first — windy days add their own wobble — and only then change my focus area.
Ethics note: If a bird changes direction or calls repeatedly, I treat that as a sign to back off and let it settle.
Try-this-next-time: Practice on common birds first (gulls, pigeons, crows). They’re generous teachers.

Puffin in a gale: on an extremely windy day the birds were almost hovering and fighting to move forward. I still kept a fast shutter (1/1250) to hold detail in the wings, used f/9, and the light was bright enough that ISO stayed low (ISO 200) (Canon 7D Mark II at 400mm).
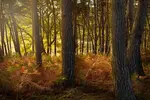
Scenario B — Dappled Woodland Light (when everything looks “muddy”)
Under trees, light arrives in patches. Your eyes handle it beautifully; the camera often produces a file that feels grey or cluttered.
Try this approach:
- Pre-visualise: “I want a calm subject and a quieter background.”
- Separation: shift your angle so the animal sits against a darker, more distant background
- Aperture: open a little (f/2.8–f/5.6 if available)
- Shutter: keep it safe for small movements (1/500–1/1000)
- ISO: lift ISO to support shutter speed
Photo moment: If a deer looks up into a brighter patch for a second, that’s often your “ordinary magic” frame. I’ll shoot a short burst, then check focus quickly.
Ethics note: In woodland, it’s easy to step closer without realising. I try to let the animal set the distance.
Try-this-next-time: Before you raise the camera, take one slow step sideways and look at the background. Often that’s the whole fix.
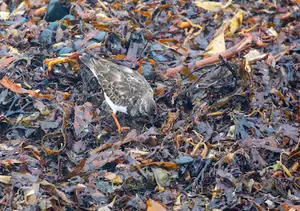
Scenario C — Subject in Shade, Bright Background (the “averaging” trap)
This is a common one on walks: a bird in shade with bright sky behind, or an animal under a hedge with sunlit grass beyond.
The camera tries to “average” the scene and your subject ends up dull.
Try this approach:
- Pre-visualise: The animal is the story; the background can be less detailed.
- Shutter: Keep it safe for movement first
- Aperture: Open enough for separation
- ISO / exposure: Raise exposure for the subject, then validate highlights with blinkies + histogram
RAW: Helpful here, because it gives you more room to recover tones
Photo moment: I’ll take one frame, check whether the subject has detail, then decide what I’m willing to lose — sometimes a brighter background is perfectly fine if the animal looks alive and present.
Ethics note: Backlit scenes can tempt us to keep repositioning. If the animal is resting, I’ll keep my movement slow and minimal.
Try-this-next-time: When you spot a bright background, see if you can move so the subject has a darker backdrop instead. It’s often easier than “fixing” exposure alone.
Scenario D — Wildlife at Dusk (when mood matters and focus gets tricky)
At dusk, the light feels beautiful and soft — and it’s also where focus and motion blur quietly sneak in.
Try this approach:
- Pre-visualise: “Sharp eye, gentle mood.”
- Aperture: as wide as is sensible for your lens
- Shutter: choose the slowest you can get away with for the animal’s movement (often 1/500+ if alert)
- ISO: accept a higher ISO rather than a too-slow shutter speed
- Validation: zoom-in focus check is especially important here
Photo moment: If the animal pauses, I’ll take a couple of frames, check the eye at 100%, then carry on walking rather than staying fixed in place.
Ethics note: Low light is when wildlife is often busiest. I avoid flash, keep my distance, and let the moment pass if it feels sensitive.
Try-this-next-time: Practise your dusk settings on a stationary subject first (a signpost, a tree trunk). It helps you learn what “safe sharp” looks like on your camera.
A Calm Practice for Your Next Walk
If you try one thing this week, try the workflow once per outing — just once — and notice how it changes your keepers.
- Pre-visualise the feeling (motion / separation / mood)
- Set the priority in that order
- Validate focus + histogram
- Then go back to walking slowly and watching
Quiet walks. Better wildlife photos.
Back to: Getting Into Wildlife Photography

I've spent over 30 years walking and photographing UK wildlife, with work featured in Canon EOS Magazine and a Wildlife Trusts calendar. I still learn something new on most outings.
This site is my field notebook full of photo tips, help on identifying what you see, and how to decide where to walk. About Me.
Step Behind the Wild Lens
Seasonal field notes from my wildlife walks: recent encounters, the story behind favourite photos, and simple, practical tips you can use on your next outing.
Explore More Nature Walks, Wildlife and Photo Tips
Why Won't My Camera Focus? Simple Fixes From a Wildlife Photographer
Frustrated by blurry photos? A simple checklist of focus fixes that work in the field and beyond — from common rookie mistakes to settings you may have missed.
How I Stopped Taking Boring Photos: My Guide to Low-Angle Photography
Feeling disappointed with your wildlife photos? This is the story of how I learned to use low-angle photography to go from boring shots to real connection.
Brighter Photos In-Camera: Settings That Fix Dark Shots
Stop fixing dark photos in editing. Learn the in-camera settings and field techniques that get your exposure right first time.


Copyright © 2018- naturewalkswithcarol.com All rights reserved
Home. | About Me | Contact Me | Blog | Privacy Policy